The Salmon Egg: From Cleaning to Curing Leave a reply

Ask any steelhead fisherman how they cure eggs and just about all of them will tell you something different, or perhaps they won't tell you anything at all. In a nutshell, egg curing recipes are like heartbeats…everyone’s got one. The main thing to consider is that the quality of the eggs you put into the cure is going to make a huge difference how well the bait turns out when the curing process is finished. For optimum effectiveness, eggs must be harvested from fairly mature fish. As the female salmonid approaches spawning, the maturation process places oil (fats) from her flesh into her eggs. It is this salmon oil that is the main scent component of effective bait eggs. Obviously, the skeins must still be firm and not too close to actual spawning. Can you catch fish on immature eggs? Absolutely! There is less oil in immature or “green” fish as evidenced by the smaller size of the skeins, but they still can catch fish. However, in our opinion, eggs harvested from maturing, autumn salmon are more effective and can be cured and preserved more efficiently.
Here are some things to consider before you cure eggs:
STEP ONE: CLEAN GLOVES, CLEAN & DRY SURFACE: START THE PROCESS
Here are some things to consider before you cure eggs:
-Bleed your fish! Getting as much blood out of the eggs as possible starts the second the fish is brought aboard. One quick slice through the gill arches is all it takes to provide excellent tasting fish and better bait! Also, I like to use disposable latex or nitrile gloves while removing the eggs to prevent any human scent transfer (STEP ONE). If there are any veins of blood left in the eggs gently slice them with scissors or a knife and milk the blood out with a spoon or the back of the knife, being careful not to press too hard. Once the blood is out of the vein wipe the eggs clean and do not use water to rinse them off. Fresh water is quickly taken into the egg across the membrane bringing unwanted blood and impurities with it. In fact, during actual spawning, this phenomenon of the egg absorbing water allows sperm from the male to easily cross into the egg, greatly facilitating fertilization.
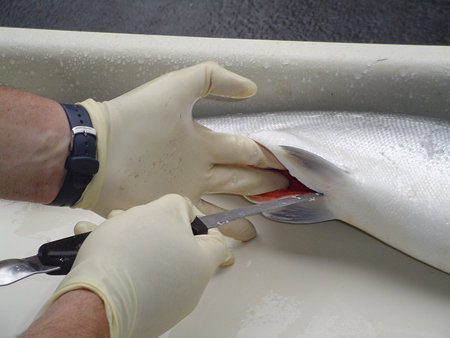
STEP TWO: BLOODLESS REMOVAL OF EGG SKEINS
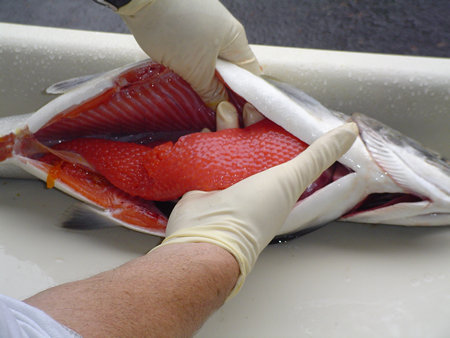
Keep the fish cool throughout the day by keeping them in a cold fish box or on ice. Some rivers, such as the Snake or Columbia, can be quite warm. If the river water isn't cool enough, keep the fish on ice to preserve the quality of your catch and the eggs. When cleaning your fish use a very shallow cut along the belly to open the cavity, so that the knife doesn't penetrate the eggs. Gently pull on each end of the skein to remove it from the cavity and be extra careful to not get the skeins dirty (STEP TWO). Have some clean paper towels spread out ready to lay the eggs on (STEP THREE). Remember; DO NOT RINSE them in the water to clean them off. Once they hit the water the egg membrane tightens and is less apt to accept the egg cure.
STEP THREE: HAVE AN ABSORBENT CLEAN PLACE READY TO LAY THE SKEINS
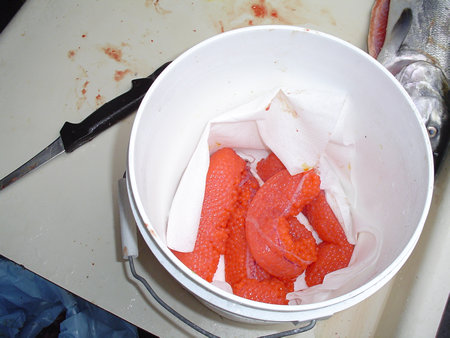
-Cure the eggs within three days of catching the fish and freeze uncured skeins only if you absolutely have to. Roll the skeins up in paper towels to absorb excess bacteria- harboring liquid and place these “egg burrito’s” in Ziploc bags or Tupperware Make sure they stay cool or in the refrigerator during this time. The reason for curing the eggs as soon as possible is that the egg membrane will start to break down over time resulting in mushy or soft bait.
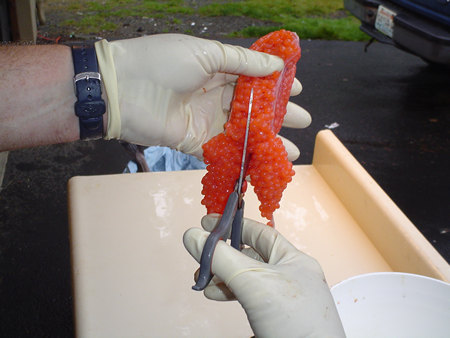
-Split the length of the skein down the center to open them up so that the cure can get to the eggs in the middle of the skein (STEP 4). Some anglers will quarter the skeins or cut them into smaller pieces before curing. I like to keep the outer membrane intact, however, so that I can cut them to size just before going fishing.
STEP FOUR: CHUNKING THE SKEINS FOR COMPLETE AND EVEN CURING
Now the eggs are ready for the curing process. There are plenty of excellent commercially produced egg cures on the market, all of which do a decent job and come with instructions. These days I use Pautzke's exclusively it sells like hot cakes for a reason, it just flat WORKS!
Here's an "old school" wet brine egg cure that will get you started.
Ingredients:
-Two quarts of water
-1 1/2 cups of powdered Borax
-2 1/2 cups of non-iodized salt
-1/2 cup of white sugar
*for red eggs add 2 tablespoons of Pro Glow bait dye powder to the mixture
-Bring the ingredients to a boil and stir the mixture constantly to ensure that everything is dissolved. Be extra careful adding the powdered bait dye, as it will stain everything.
-Remove the mixture from the heat and let the cure cool until it is luke warm.
-Add the eggs to the cure when it is still warm and stir them every few minutes to ensure that the mixture gets into the center of the skeins. Smaller eggs from steelhead and silvers will only need about 10 to 15 minutes in the bath and large eggs like chinook usually take up to 45 minutes.
-Remove the eggs and place them in a strainer long enough to allow most of the liquid to drain off. Lay the eggs out on newspaper for 10 to 24 hours, or until they are dried to your preference. A word of caution, if the eggs aren't drained of liquid long enough they will stick to the newspaper, so drain them of as much liquid as you possibly can.
-Dust the skeins with Borax and package them to your preference.
Adding scents to your eggs:
You can add herring, sardine, anchovy, shrimp, and anise oils, to name a few, to your brine prior to adding your eggs. Don't go too heavy on the scents, however, as too much oil can turn your eggs into a slimy mess. A tablespoon of oil in the brine is enough to get the job done.
Speaking of adding scents, Pautzke Fire Cure is a dry preparation that includes shrimp scent in the form of freeze dried krill within the mix. Pautzke’s is a very mild cure that can be left on the eggs for days without damaging them. This long term process results in a wet, “milking” cure that is superior for salmon fishing. For steelhead fishing however, we desire a drier cure that results in a tougher egg cluster that is slower to milk out and will remain on the hook for repeated casting. For this reason I add non-iodized (Pickling & Canning salt) to the Pautzke Fire Cure formula.
The “dry cure” process start to finish.
-Cut the clean, blood-free skeins into smaller chunks, retaining the tough outer membrane on each section. Coho skeins: approximately 6-8 chunks, Chinook skeins approximately 8-12 chunks.
Place the chunks in a clean plastic bucket (Non metallic) and sprinkle the Fire Cure over the eggs, gently mixing with your gloved hands. Sprinkle & mix again to ensure coverage.
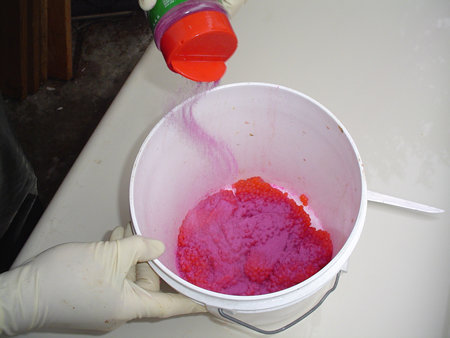
Add salt slowly until you observe a “bubbly” moist curtain over the top of the mixture.
-Mix again; adding a bit more salt and leave in a cool, dark & dry place overnight.
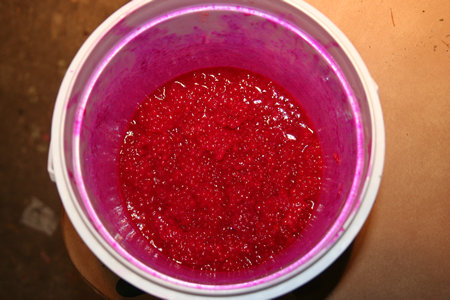
-Every 6-8 hours, gently mix with gloved hands. Halfway through this process the eggs will produce a fluid or “liquor” that will cover the eggs and the eggs will appear deflated and ruined. Don’t worry! All the fluid will be reabsorbed into the eggs bringing the cure & coloring deep into the egg!
Once the eggs “plump up” again roll out some paper towels and lay the eggs out to remove excess liquid (Figure 7). This is the beginning of the drying process which determines the toughness of your bait. The longer you air-dry, the more durable the egg.

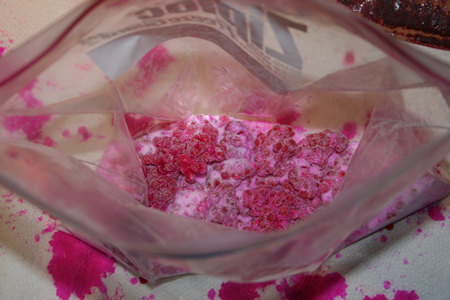
With your eggs air-dried its Borax time. Dump some Borax in a Ziploc and then start placing eggs in and shake the Borax into every crevice (Figure 8). This is the second component of your drying process. The longer your bait lays in the borax, the drier your final product.
A word on packaging:
After boraxing you might consider rolling your eggs up in to paper towel “burritos”. I like to put about 3-4 chunks into a burrito and 3 burritos into a gallon Ziploc for freezing. In this way I can thaw the exact amount of eggs I need each day and cut the perfect size clusters from the chunks.
If you'd like to vacuum pack your cured eggs place them in the freezer for 6 to 12 hours prior to packaging. Once the eggs are frozen slightly they won't burst when they are vacuumed. Another great way to put up eggs is to keep them in Tupperware containers, which are easily stacked in the freezer.
These cures will give you excellent eggs that will catch both salmon and steelhead. With time and experience you might also be able to tweak these recipes a little to create your own cures!